Promotions : Optional
Powerful tools for Promoting products
Optional options for promotions provide flexibility and precision in tailoring customers' search. They allow you to
- Enhance Visibility
- Personalize User Experience
- Optimize Campaign Performance
- Control Product Placement
- Improve Efficiency
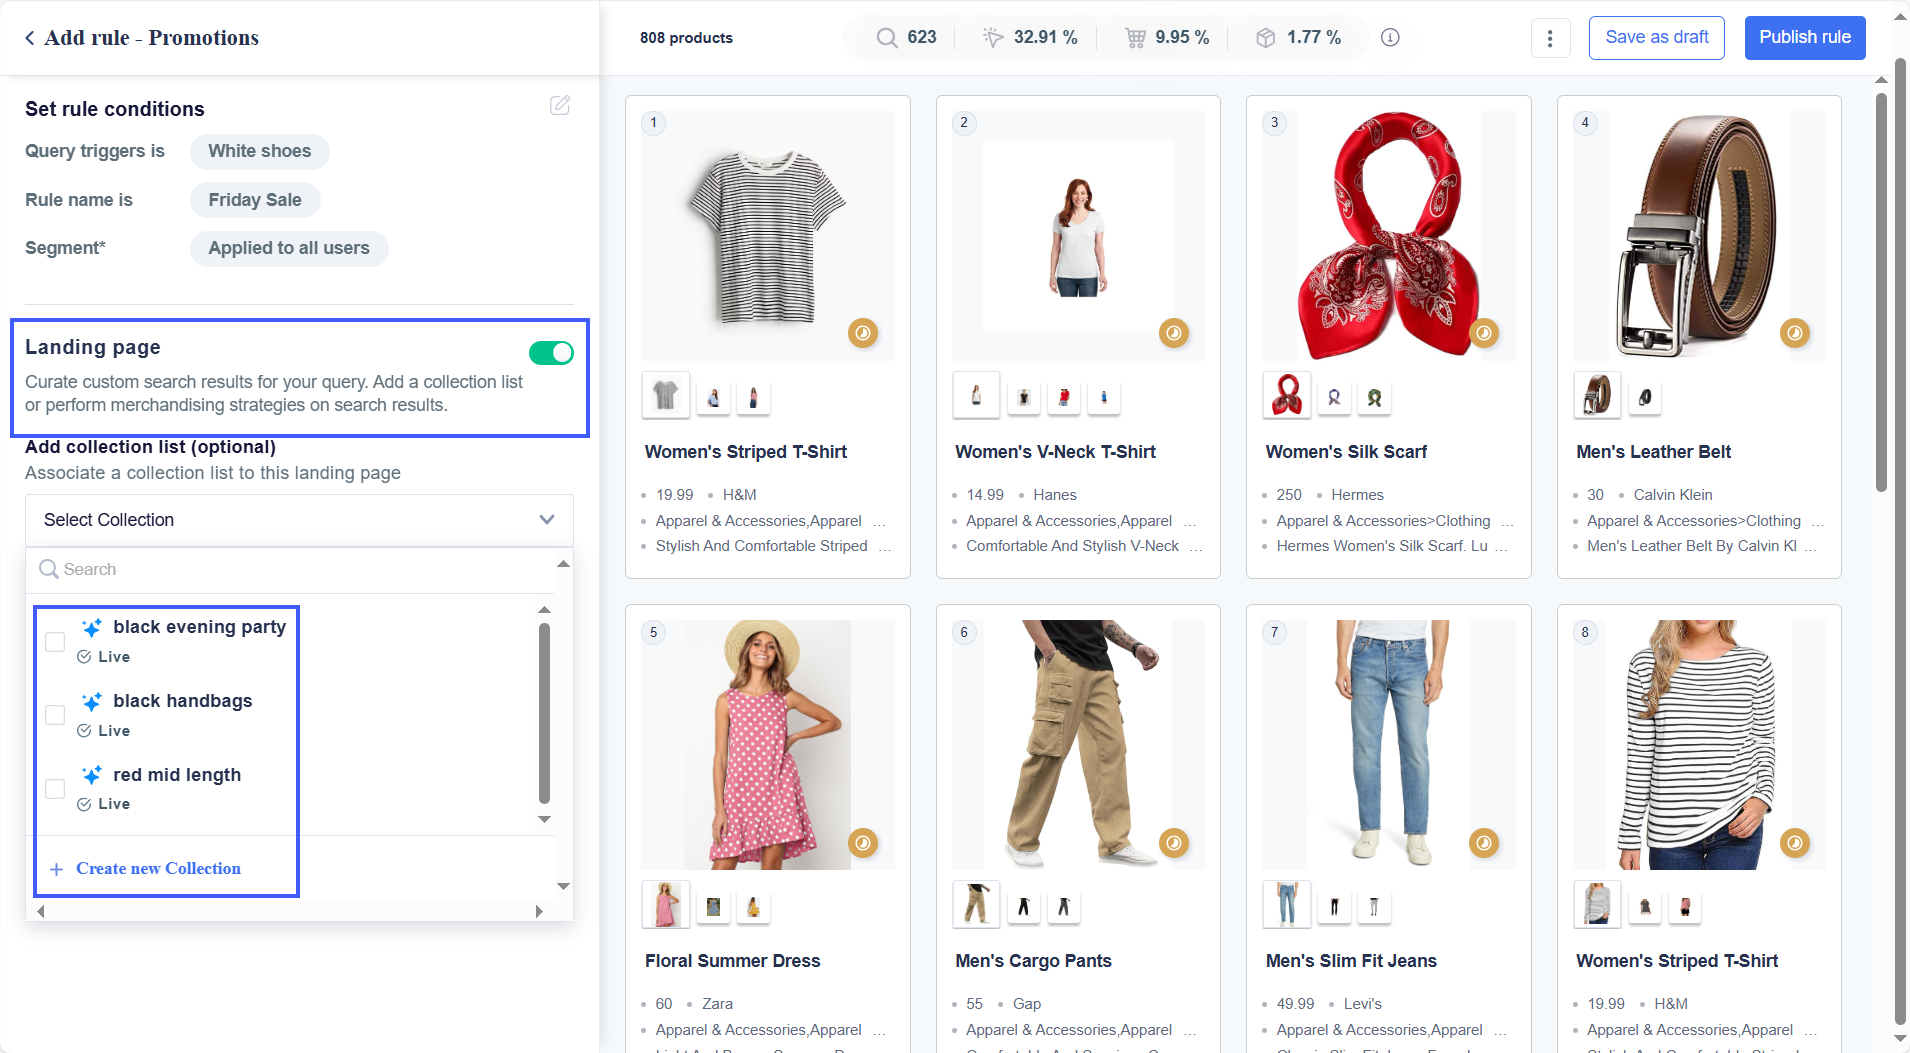
Create a Landing Page
Curate custom search results for your query. Add a collection list or perform merchandising strategies on search results. Landing Pages are dedicated custom results pages built for specific queries. Merchandiser-driven landing pages offer full control, letting you access your entire catalog, override algorithms, and curate the search results using merchandising strategies.
To create landing pages, toggle the button to green. Once enabled, the preview section will display all the products in your catalog. You can also Add collection list (optional) to associate a collection list to this landing page.
Add a Collection Page
You can use Collections to associate a curated product set with the landing page by selecting one or multiple Collections from the drop-down menu. You can create new ones by clicking + Create New Collection. After associating Collections with the landing page, the preview will update to display only the products included in the selected Collections
If you prefer to add customizations on top of the search results produced by Netcore Unbxd AI and don’t want to access your complete catalog, you can proceed without enabling the Landing Page option (keep it in its default disabled state). Refer here to understand about collcetions.
Landing Page Collection
AI-Suggested Queries
AI-Suggested Queries recommend relevant search terms and category-based recommendations based on past search patterns, user behavior, popular searches, and semantic understanding. This helps users refine their queries, discover products efficiently, and reduce zero-result searches.
If you enter White Dresses as a query, the algorithm will surface related terms like: white dress, white shoes, white bag, white sneakers, and so on.
This helps users refine their queries, discover products efficiently, and reduce zero-result searches.
Click the + icon next to each query you want to include, then click Apply Changes. The same rules will now apply to all the selected queries.
AI Suggested similar queries
Set up A/B test
A/B testing is a method of comparing two different strategies or approaches to see which one delivers better results. In the context of merchandising, it allows you to test different sets of promotional strategies, such as varying how products are displayed or ranked in the search results. You can enable the A/B test option to compare two strategies you’ve curated or pit your merchandising strategy against Netcore Unbxd’s default result set.
- Traffic split: Choose how to divide traffic between variations, with options like 50-50, 60-40, or 70-30. Ensure the total equals 100%.
- Select a KPI: Determine the key metric to decide the winning strategy. Use the Winner is decided by drop-down to choose from Click Rate, Average Order Value, Revenue Per Visit, Conversion Rate, or Cart Rate.
- Set test duration: Specify the test duration, which should be shorter than the overall campaign timeline.
- Fallback strategy: Select a preferred fallback variation from the Preferred option in case there is no winner drop-down. This will ensure the campaign continues seamlessly even if no winner is determined during the test period. Once done, click Apply.
You can now proceed with configuring the merchandising strategy.
- If testing Variation A against Variation B, you’ll need to customize the result set for each variant.
- If testing Variation A against Netcore Unbxd’s default result set, you’ll only need to set the strategy for Variation A.
Boost or Bury specific products
Boost is a merchandising strategy that lets you control the visibility of products in search results based on specific conditions:
- Boost (Boost Value = 1 to 100): Highlight products by increasing their ranking on the search results page when certain conditions are met.
- Bury (Boost Value = -1 to -100): Lower product visibility by lowering their ranking on the search results page when the set conditions are met.
Note:If you enable Boost, it automatically disables Sort. Both of the strategies cannot be selected.
Set up use the Boost option
Click the Boost button in the Set merchandising strategy section. Choose the Attribute you want to base the condition on from the drop-down menu. Define the Operator by clicking the = button and selecting the desired one (e.g., equals, contains). Select the attribute value that the condition will match or exclude. Refer here to understand the operators offerref by Netcore Unbxd.
Add multiple conditions within a Boost group
After adding first rule to the Boost group, use + to add another attribute to include additional rules within the same Boost group. All conditions within the group must be met for the Boost Value of the Boost group to apply. If even one condition fails, the Boost Value will not be applied.
Each Boost group will have its own Boost Value.
Configure the Boost Value:
After configuring the rules, set the Boost Value. A positive (Boost Value = 1 to 100) boost value moves qualifying products higher in search results. A negative (Boost Value = -1 to -100) boost value moves qualifying products lower in search results.
Boost Value cannot be set to 0.
Add new Boost groups
Use + to add new Boost Group to create additional Boost groups. The assigned Boost Value will be applied if all the conditions in any Boost groups are met.
Groups are connected with an OR condition it means if the products meet all the conditions of at least one group, they will be included.
Delete existing Boost conditions
If you accessed this page from the listing page, click the Edit icon next to Boost in the Strategy Summary section. To delete an entire Boost group, click the Delete icon next to the desired group and confirm your action.
To remove a specific Boost condition within a group, click the Delete icon next to the condition and confirm your action. Once you have configured the rule, click Apply boost. You can also view your merchandising strategy summary by clicking the View summary button.
Viewing the summary before applying the changes will lead to the configurations being lost. It is recommended that you click Apply boost before viewing the summary.
Publish the rule to your live site
Click the Save button to retain the Campaign as a draft. or continue adding more rules. Click the Publish rule button to push it live.
Pin Products
Pinning products allows you to control the positioning of specific items in the search results, ensuring they appear in a fixed, prioritized spot based on your merchandising strategy. T
- Drag and Drop
On the right side of the screen, drag and drop products into the desired position to pin them.
If a product is already pinned at a position, it will automatically shift to the next available position when you drop a new product into that spot.
- Hover and Pin
Hover over the product in the preview and click the Pin icon to keep it in place, unaffected by other rules or AI.
This works only for products already in the desired position.
- Use .CSV File
If your merchandising team has set up product positions, you can upload the setup quickly by uploading a .CSV file. Click Pin strategy > Upload Pins (.CSV), then drag and drop the file to apply the setup. - Delete Pins
To delete a pinned product, click the Delete icon next to the pinned product in the strategy summary or hover over the product and click the Pin icon to unpin it.
To remove all pins, go to Pin Settings and select Clear Pins. After configuring the pinning rule, click Apply pin. You can also view the merchandising strategy summary, but it’s recommended to apply the pin first to avoid losing changes.
- Publish the Rule
After applying the pin, you can either Save the campaign as a draft, continue adding more rules, or Publish the rule to push it live.
Sort
Sorting allows you to organize search results based on selected attributes, providing a more tailored and prioritized shopping experience. You can sort products in various ways, such as by numerical values (price, ratings) or text-based attributes (brand, material type).
Numerical Attributes : Sort in ascending (lowest to highest) or descending (highest to lowest) order, useful for attributes like Price, Ratings, or Stock Quantity.
Text Attributes: Sort alphabetically, either from A-Z or Z-A, helpful for attributes like Brand, Material Type, or Category.
By default, products are displayed based on their relevance to the shopper's query, but sorting gives you more control to override this behavior.
ImportantEnabling sorting disables other merchandising strategies like Boost, Pin, and Slot.
- Setting up Sort
Select the Attribute to Sort By. Click the Sort button in the Set merchandising strategy section. From the drop-down, choose the attribute you want to sort by (e.g., Price, Brand). - Choose the Sort Order
Choose either Ascending or Descending depending on how you want the results organized. You can further refine the sorting by adding multiple conditions. Each condition will apply sequentially with the THEN operator, like a layered sorting rule.
For Example, First Rule: Sort by Material_Type in ascending order (A-Z). Products made of Cotton will appear before Leather, followed by Velvet. Second Rule: Sort by Price in descending order (High to Low). Among products made of the same material, the most expensive products will be listed first.
To add more conditions, click +Add a set of conditions and repeat the sorting process for each additional attribute.
- Delete an existing Sort Conditions
If you are on the listing page, click the Edit icon next to Sort By in the Strategy Summary section. To remove a sort condition, click the Delete icon next to it and confirm by clicking Delete.
After configuring the sort rule, click Apply sort to save your changes. You can view your merchandising strategy summary by clicking View summary, but be aware that viewing the summary before applying will lose the current configurations.
It is recommended to click Apply sort before viewing the summary.
Continue adding more rules if needed or click Publish rule to push the sorting strategy live to your site.
Slot
Slotting allows you to assign specific products to predefined positions in the search results. Unlike Pin, which locks a product in place, Slot ensures a product only occupies the assigned position if it meets the defined conditions. If the conditions are not met, the slot remains empty, and other rules or algorithms determine the products in those positions. Slotting can cover multiple positions at once, offering more flexibility than Pinning, which is restricted to a single product and position.
- Set up Slot
Navigate to the Set merchandising strategy section and click the Slot button.
- Define the range of positions where you want to slot the products. For example, position 1 to position 3.
- Choose the attribute you want to use for the condition. For example,, Brand, Price, Category.
- Select the operator like equals, contains to define the condition that the products must meet.
- Choose the value for the attribute that the condition will match or exclude. For example, Price = 100.
- Multiple Conditions within a Slot Group
Once the first condition is added, you can click+Add Another Attribute to add additional conditions. All conditions within a Slot group must be met for the product to occupy the designated slot. Products that don’t meet all conditions will not be slotted into those positions.
NoteProducts cannot be Pinned and Slotted at the same position.
- Add New Slot Groups
Click+Add New Slot Group to define a new range of positions for the products. Each slot group will have specific conditions to filter the products eligible for those positions. OR condition: Slot groups are connected with an OR condition, meaning that products meeting the conditions of at least one group will be included. - Delete Existing Slot Conditions
If you're on the listing page, click the Edit icon next to Slot in the Strategy Summary section. To remove a Slot group, click the Delete icon next to the group and confirm the action. To remove a specific Slot condition within a group, click the Delete icon next to the condition and confirm your action.
After configuring the slot rule, click Apply slot to save your changes. You can view your merchandising strategy summary by clicking View summary, but it is recommended to click Apply slot before viewing to prevent losing your changes. Continue adding more rules if necessary or click Publish rule to make the changes live on your site.
Filter
Filtering products enables you to include or exclude specific products from the search results based on defined criteria. Unlike other merchandising strategies like Boost, Sort, Slot, or Pin, Filter strictly removes products that don’t meet the set conditions, ensuring only the most relevant items are displayed.
- Set up Filter
Navigate to the Set merchandising strategy section and click the Filter button. Choose the attribute you want to base the condition on (e.g., Price, Brand, Category). If the attribute is missing from the dropdown, navigate to the Field Configuration page to add it to the configuration table. Define the operator (e.g., equals, contains) to compare the attribute value. Select the value that the attribute should match or exclude (e.g., Price = 100).
Filterh and shopping experience
- Multiple Conditions within a Filter Group
Click+Add Another Attribute to include more conditions in the same group. All conditions within a Filter group must be satisfied for the product to be included. If any condition is not met, the product will be excluded. - Adding New Filter Groups
Click+Add New Filter Group to create additional groups with separate conditions. Products that meet the conditions of the secondary filter groups will be shortlisted.
Filter groups are connected with an OR condition. This means if the products meet the conditions of at least one group, they will be included.
- Delete Existing Filter Conditions
To delete an entire Filter group, click the Delete icon next to the group and confirm your action. To remove a specific Filter condition within a group, click the Delete icon next to the condition and confirm your action.
Save the campaign as a draft if you want to retain it for later or continue adding more rules if necessary. Click Publish rule to make the filter strategy live on your site.
Updated about 2 months ago